
No matter how much I love the nice shiny, sparkling paint on this trolley, it's gotta be knocked down a notch. I need to have this trolley look like a hard working, earning a living, turning a buck, work a day trolley. And yet retain some of its cared for and maintained shine.
For this weathering project, I'm going to be using weathering powders. These are very fine powders that include a bonding agent that is activated from the friction of scrubbing on the powders.
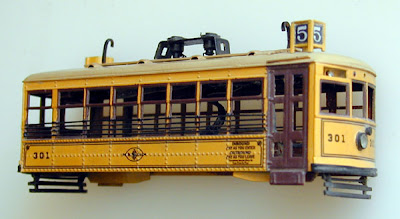
 The lightest colors seem to have the hardest time showing up where as the darkest colors are too easy to apply. So, as you can see, I start with the lightest color first. The light gray is perfect for making the paint appear faded (the left side of the car is weathered and the right side is untouched to illustrate the difference the powder makes). Next is the nice light tan for simulating dust, then dark tan for simulating dirt. And finally dark brown for grime. I'm mostly interested in the fading and dusting effects for simulating the hot and dusty desert-by-the-sea climate of San Diego.
I love the effect that the powders makes on my models, it makes them look so dusty and dry. The biggest difference the powders made are on the mahogany doors and windows. Note how you can see them now, the surface details being brought out, where as before the doors were so glossy and translucent that you really couldn't see them (compare to top photo).

Probably the best feature of weathering powders is how forgiving they are. If you don't like the results, simply wash it off. Or, you can tone it down dramatically with a coating of dullcote. I sprayed the car with a coat of gloss. That way the car is weathered and shiny. The gloss coat did away with about 95% of the weathering, but, 5% of the weathering remains. The car is very nicely lightly weathered and yet retains the shine of a new, cared for and maintained trolley car.
 Then I went back in and did a little more light weathering with the powders. This time I won't affix them with anything, just letting the bonding agent in the powders do its thing. So now I have a slightly weathered trolley, but shiny too! Yessir! Weathered yet shiny too!
 Then I went back in and did a little more light weathering with the powders. This time I won't affix them with anything, just letting the bonding agent in the powders do its thing. So now I have a slightly weathered trolley, but shiny too! Yessir! Weathered yet shiny too!


